English
 中文
中文Different applications like Gimp and Windows Paint create PNG files of different sizes for the same screenshot. I am going to show how to parse PNG files by using Python and try to figure out the reason for the difference.
Introduction
PNG is one of the commonly used image formats on the Internet. I used to save screenshots as PNG files. Unlike normal photos, screenshots of software applications usually have less colors. Using PNG, we can easily get images with good qualities and small file sizes. What’s more, it’s an open source format. For these reasons, I prefer PNG to other formats when creating screenshots.
To be honest, I hadn’t paid much attention to the actual sizes of PNG files generated by software tools until recently when I need to create some PNG files for my blog and web pages. I mainly use two software tools to create screenshots which are Gimp and Windows Paint. I assumed that these tools would generate PNG files of optimal sizes. Whereas, I noticed recently that Gimp and Windows Paint generate PNG of different sizes of the same screenshot. Although there are no options about PNG format in Windows Paint, it still creates smaller PNG files than Gimp with the highest compression level selected. Then I was curious about the difference. So I did some experiments. In this post, I am going to share something I have learned about PNG from the process.
PNG format
Here, PNG refers to Portable Network Graphics. It’s a raster graphics file format. It was created as a replacement to GIF which uses a patented compression algorithm LZW. Please refer to the Wikipedia for more details of PNG format.
Basically a PNG file starts with 8-byte header followed by chunks. Each chunk consists of four parts:
- Length of the chunk – 4 bytes
- Chunk type – 4 bytes
- Chunk data – (Length of the chunk) bytes
- CRC – 4 bytes
That is, if the first four bytes of a chunk is 8192 as an integer, it means that the data of the chunk has 8192 bytes, and the full size of the chunk is 4+4+8192+4 = 8204 bytes.
The second four bytes of a chunk indicates the type of the chunk, which is the case sensitive chunk type in ASCII format. A valid PNG file must have at least the following four critical chunk types:
- IHDR: Must be the first chunk. It contains the meta information about the image like width, height etc
- PLTE or sRGB: List of colors or the standard sRGB colors depending on the type of PNG
- IDAT: Image data
- IEND: Marks the end of the image
A PNG file can contain multiple IDAT chunks. To decode a PNG file, all IDAT chunks in a PNG file will be concatenated and the combined IDAT data is decompressed to give the image.
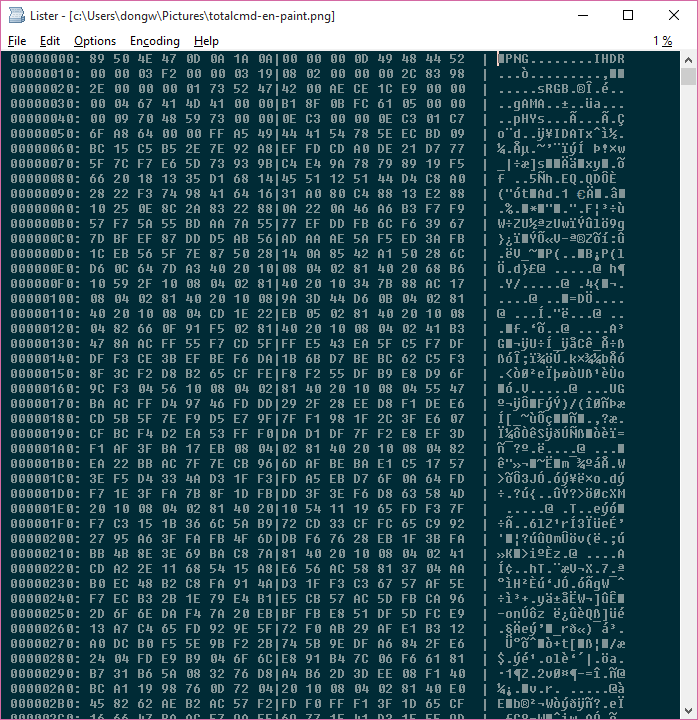
The following is a screenshot of TotalCommander Lister showing a PNG file in Hex format. We can see the first 8-byte header followed by IHDR and sRGB chunks:
Parse PNG file using Python
Firstly, let’s create a class to model chunks in a PNG file:
1 2 3 4 5 6 7 8 9 10 11 12 13 14 15 16 17 18 19 20 21 22 23 24 25 26 27 28 29 30 31 32 33 34 35 36 37 38 39 40 41 42 43 44 45 46 47 48 49 50 51 52 53 54 55 56 57 58 59 60 61 62 63 64 65 66 67 |
class Chunk(object): '''Definition of a chunk contained in a PNG file ''' def __init__(self, buf): '''TODO: to be defined1. ''' self.__length = 0 self.__type = 0 self.__data = [] self.__crc = 0 self.__size = 0 # The total size of the chunk in bytes if buf: self.load(buf) def load(self, buf): '''Load the chunk from the given buffer. @param buf List of bytes read from the PNG file @return: None ''' length_buf = binascii.hexlify(buf[:4]) #self.__length = int(''.join(length_buf), 16) self.__length = int(length_buf, 16) fmt = '4c' #self.__type = ''.join(struct.unpack(fmt, ''.join(buf[4:8]))) self.__type = buf[4:8].decode() end_data = 8+self.__length self.__data = buf[8:end_data] buf = buf[end_data:] crc_bytes = binascii.hexlify(buf[:4]) #self.__crc = int(''.join(crc_bytes), 16) self.__crc = int(crc_bytes, 16) self.__size = 8 + self.__length + 4; def totalSize(self): '''TODO: Returns the total size of the chunk in bytes. @return: TODO ''' return self.__size def type(self): '''TODO: Docstring for type. @return: TODO ''' return self.__type def data(self): '''TODO: Docstring for data. @return: TODO ''' return self.__data def length(self): '''TODO: Docstring for length. @return: TODO ''' return self.__length |
To decode a PNG file, firstly open the file, read the content into a buffer, then decode the header and chunks:
1 2 3 4 5 6 7 8 9 10 11 12 13 14 15 16 17 18 19 20 21 22 23 24 25 26 27 28 29 30 31 32 33 34 35 36 37 38 39 40 41 42 43 44 45 46 47 48 49 50 51 52 53 54 55 56 57 58 59 60 61 62 63 64 65 66 67 68 69 70 71 72 73 74 75 76 77 78 79 80 81 82 83 84 |
class PNG(object): '''class for a PNG file. ''' def __init__(self, file_path): '''TODO: to be defined1. ''' self.__fileName = file_path self.__file = None self.__fobj = None self.size = [0, 0] self.__chunks = [] # List of chunks self.__width = 0 self.__height = 0 self.__bitDepth = 0 self.__colorType = 0 self.__cmpMtd = 0 self.__fltMtd = 0 self.__itlMtd = 0 self.__totalIDAT = 0 if file_path: self.readFile(file_path) self.__file = file_path def loadHeader(self, buf): '''TODO: Docstring for loadHeader. @param buf Byte buffer read from the import file @return: TODO ''' pass def readFile(self, file_path): '''TODO: Docstring for readFile. @param file_path Full path to the png file @return: True if successful, False otherwise ''' if file_path is None and self.__file is None: logger.info("File name is empty. Nothing to load!") return if file_path is not None: self.__file = file_path # Open the file for reading self.__fobj = open( self.__file, 'rb') fsize = os.path.getsize( file_path ) # map the file into memory fno = self.__fobj.fileno() data = mmap.mmap( fno, fsize, access=mmap.ACCESS_READ ) fmt = '8c' header = struct.unpack( fmt, data[:8] ) # Get the header information #self.loadHeader() #logger.debug("Header: %s" % header ) #working buffer buf = data[8:] ihdr = Chunk(buf) self.parseIHDR(ihdr.data() ) chunk_size = ihdr.totalSize() self.__chunks = [] self.__chunks.append(ihdr) while len(buf) > chunk_size: buf = buf[chunk_size:] ck = Chunk(buf) chunk_size = ck.totalSize() self.__chunks.append(ck) self.parseIDAT() ### close the file data.close() self.__fobj.close() ... |
A valid PNG file contains at least one IDAT chunk. IDAT chunks contain compressed image data, which is a rectangular pixel array. Each pixel consists of color information. There are mainly three types of pixels in PNG files:
- Grayscale pixel. Minimum pixel size: 1 bit
- Color-indexed pixel. Minimum pixel size: 1 bit
- Truecolor pixel: Minimum pixel size: 24-bit
Optionally, each pixel can have transparence information which is 8-bit. Therefore, a truecolor pixel with transparence consists of 4 bytes.
Image data is organized from the top to bottom. Each row of the image data is packed from the left to the right to form a scanline. Each scanline always starts with a single byte indicating the filter type followed by the packed pixel array of the image. All scanlines are then compressed by using DEFLATE algorithm which is the same as in zlib. We can use zlib module in Python to decompress data in IDAT chunk as shown below:
1 2 3 4 5 6 7 8 |
def testCompress(self): idat_data = b'' self.__totalIDAT = 0 for i in range(1, len(self.__chunks)): if self.__chunks[i].type() == 'IDAT': idat_data += self.__chunks[i].data() img_data = zlib.decompress( idat_data ) ... |
Please refer to zlib RFC page for more details of the ZLIB compress data format specification. Basically zlib compressed data always has two bytes in the beginning to indicate compression information. For example, the first two bytes of zlib compressed data would appear to be “78 da” in hexadecimal. From these two bytes, we can guess some parameters used in DEFLATE algorithm. But can only get possible values for some parameters like compression level, because different compression level may result in the same header values in the compressed data. In order to figure out the actual compression parameters, we can use a try and error method to test the combination of parameters with commonly used values in Python.
There is already a Python module to parse PNG file. But because I want to test different data compression parameters, I wrote a Python script for the purpose. The complete Python script file can be downloaded from here. The downloaded Python script, sspng.py, works with Python 2.7 and 3.4. It accepts one argument as the path to a png file, dumps the image mata information, and tries to figure out the compression parameters used to create the PNG file. If failed, it prints the actual IDAT sizes if using the compression parameters used in the test.
Exampels
Let’s take a screenshot of TotalCommander on Windows 10 x64 as an example, which is shown below.
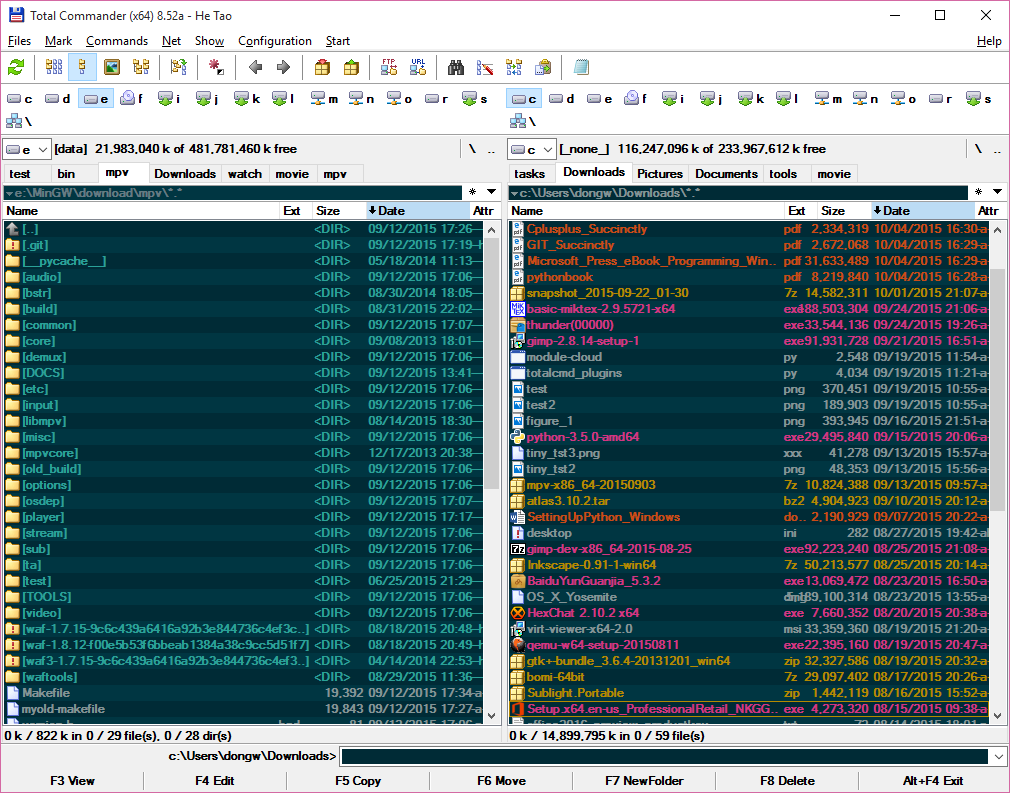
To take the screenshot, bring TotalCommander to the front on the desktop, press Alt-PrtScrn. It will copy the screenshot of TotalCommander to the clipboard. Then paste the image in applications which we want to use to edit and save the screenshot. Here, I am going to use Gimp v2.9 development version and the default Windows Paint. When saving the screenshot as a PNG in these two applications, there is no option to select in Paint regarding PNG file, whereas there are options including the compression level in Gimp to select. Take the default options in Gimp which means to use the highest compression level 9. The generated file sizes are shown below:
- Paint: 125,149 bytes
- Gimp: 162,688 bytes
Assume the PNG file of the above screenshot created by Gimp is saved as c:\users\wdong\Pictures\totalcmd-en-gimp.png, we can run sspng.py on it as shown below:
1 2 3 4 5 6 7 8 9 10 11 12 13 14 15 16 17 18 19 20 21 22 23 24 25 |
C:\Users\dongw\Pictures>c:\Python27\python.exe sspng.py totalcmd-en-gimp.png Information about totalcmd-en-gimp.png IHDR information: Width: 1010 Height: 793 Bit depth: 8 Color type: 2 Compression method: 0 Filter method: 0 Interlace method: 0 Chunk pHYs: Data length: 9, total size: 21 bytes Chunk tIME: Data length: 7, total size: 19 bytes Chunk tEXt: Data length: 25, total size: 37 bytes Chunk IDAT: IDAT chunk size: 8192 bytes, total IDAT size: 162326 bytes Chunk IEND: Data length: 0, total size: 12 bytes size of img_data = 2403583 zlib header in the PNG file = 78, da With compression level 9, mem_level 8, strategy 1, zlib.compress gives 162326 bytes |
From the above information, we know that the image height is 793 pixels. This means that there are 793 scanlines in IDAT chunk. The color type is 2 so there are 3 bytes (24 bits) per pixel. The first byte of each scanline contains filtering information. The uncompressed image data has (1+1010*3)*793=2403583 bytes. The compressed data is split into multiple IDAT chunks in the file. Each IDAT chunk contains 8192 bytes. The total compressed image data has 162326 bytes. It seems that Gimp uses the standard DEFLATE algorithm to compress the image data when creating PNG file, for we can get the same sized data by compressing the same image data using zlib module of Python.
Running the script on the screenshot created by Windows Paint shows the following information:
1 2 3 4 5 6 7 8 9 10 11 12 13 14 15 16 17 18 19 20 21 22 23 24 25 26 27 28 29 30 31 32 33 34 35 36 37 38 39 40 41 42 43 44 45 46 47 48 49 50 51 52 53 54 55 56 57 58 59 60 61 62 63 64 65 66 67 68 69 70 71 72 73 74 75 76 77 78 79 80 81 82 83 84 85 86 87 88 89 90 91 92 93 94 95 96 97 98 99 100 101 102 103 104 105 106 107 108 109 110 111 112 113 114 115 116 117 118 119 120 121 122 123 124 125 126 127 128 129 130 131 132 133 134 135 136 137 138 139 140 141 142 143 144 145 146 147 148 149 150 151 152 153 154 155 156 157 158 159 160 161 162 163 164 165 166 167 168 169 170 171 172 173 174 175 176 177 178 179 180 181 182 183 184 185 186 187 188 189 190 191 192 193 194 195 196 197 198 199 200 201 202 203 204 |
C:\Users\dongw\Pictures>c:\Python27\python.exe sspng.py totalcmd-cn-paint.png Information about totalcmd-cn-paint.png IHDR information: Width: 1010 Height: 793 Bit depth: 8 Color type: 2 Compression method: 0 Filter method: 0 Interlace method: 0 Chunk sRGB: Data length: 1, total size: 13 bytes Chunk gAMA: Data length: 4, total size: 16 bytes Chunk pHYs: Data length: 9, total size: 21 bytes Chunk IDAT: IDAT chunk size: 65445 bytes, total IDAT size: 124688 bytes Chunk IEND: Data length: 0, total size: 12 bytes size of img_data = 2403583 zlib header in the PNG file = 78, 5e With compression level 0, mem_level 1, strategy 0, zlib.compress gives 2427294 bytes With compression level 1, mem_level 1, strategy 0, zlib.compress gives 176182 bytes With compression level 2, mem_level 1, strategy 0, zlib.compress gives 160285 bytes With compression level 3, mem_level 1, strategy 0, zlib.compress gives 146284 bytes With compression level 4, mem_level 1, strategy 0, zlib.compress gives 134058 bytes With compression level 5, mem_level 1, strategy 0, zlib.compress gives 125760 bytes With compression level 6, mem_level 1, strategy 0, zlib.compress gives 117158 bytes With compression level 7, mem_level 1, strategy 0, zlib.compress gives 116340 bytes With compression level 8, mem_level 1, strategy 0, zlib.compress gives 113287 bytes With compression level 9, mem_level 1, strategy 0, zlib.compress gives 111966 bytes With compression level 0, mem_level 2, strategy 0, zlib.compress gives 2415384 bytes With compression level 1, mem_level 2, strategy 0, zlib.compress gives 170222 bytes With compression level 2, mem_level 2, strategy 0, zlib.compress gives 155723 bytes With compression level 3, mem_level 2, strategy 0, zlib.compress gives 143172 bytes With compression level 4, mem_level 2, strategy 0, zlib.compress gives 129169 bytes With compression level 5, mem_level 2, strategy 0, zlib.compress gives 122506 bytes With compression level 6, mem_level 2, strategy 0, zlib.compress gives 114908 bytes With compression level 7, mem_level 2, strategy 0, zlib.compress gives 114331 bytes With compression level 8, mem_level 2, strategy 0, zlib.compress gives 111654 bytes With compression level 9, mem_level 2, strategy 0, zlib.compress gives 110420 bytes With compression level 0, mem_level 3, strategy 0, zlib.compress gives 2409474 bytes With compression level 1, mem_level 3, strategy 0, zlib.compress gives 164668 bytes With compression level 2, mem_level 3, strategy 0, zlib.compress gives 150928 bytes With compression level 3, mem_level 3, strategy 0, zlib.compress gives 139918 bytes With compression level 4, mem_level 3, strategy 0, zlib.compress gives 124791 bytes With compression level 5, mem_level 3, strategy 0, zlib.compress gives 118426 bytes With compression level 6, mem_level 3, strategy 0, zlib.compress gives 112056 bytes With compression level 7, mem_level 3, strategy 0, zlib.compress gives 111606 bytes With compression level 8, mem_level 3, strategy 0, zlib.compress gives 108879 bytes With compression level 9, mem_level 3, strategy 0, zlib.compress gives 107891 bytes With compression level 0, mem_level 4, strategy 0, zlib.compress gives 2406529 bytes With compression level 1, mem_level 4, strategy 0, zlib.compress gives 161203 bytes With compression level 2, mem_level 4, strategy 0, zlib.compress gives 148187 bytes With compression level 3, mem_level 4, strategy 0, zlib.compress gives 137649 bytes With compression level 4, mem_level 4, strategy 0, zlib.compress gives 121817 bytes With compression level 5, mem_level 4, strategy 0, zlib.compress gives 115812 bytes With compression level 6, mem_level 4, strategy 0, zlib.compress gives 110109 bytes With compression level 7, mem_level 4, strategy 0, zlib.compress gives 109712 bytes With compression level 8, mem_level 4, strategy 0, zlib.compress gives 107154 bytes With compression level 9, mem_level 4, strategy 0, zlib.compress gives 106122 bytes With compression level 0, mem_level 5, strategy 0, zlib.compress gives 2405059 bytes With compression level 1, mem_level 5, strategy 0, zlib.compress gives 159511 bytes With compression level 2, mem_level 5, strategy 0, zlib.compress gives 146528 bytes With compression level 3, mem_level 5, strategy 0, zlib.compress gives 136218 bytes With compression level 4, mem_level 5, strategy 0, zlib.compress gives 120177 bytes With compression level 5, mem_level 5, strategy 0, zlib.compress gives 114230 bytes With compression level 6, mem_level 5, strategy 0, zlib.compress gives 108545 bytes With compression level 7, mem_level 5, strategy 0, zlib.compress gives 108230 bytes With compression level 8, mem_level 5, strategy 0, zlib.compress gives 105560 bytes With compression level 9, mem_level 5, strategy 0, zlib.compress gives 104583 bytes With compression level 0, mem_level 6, strategy 0, zlib.compress gives 2404324 bytes With compression level 1, mem_level 6, strategy 0, zlib.compress gives 158833 bytes With compression level 2, mem_level 6, strategy 0, zlib.compress gives 146029 bytes With compression level 3, mem_level 6, strategy 0, zlib.compress gives 135299 bytes With compression level 4, mem_level 6, strategy 0, zlib.compress gives 120105 bytes With compression level 5, mem_level 6, strategy 0, zlib.compress gives 114075 bytes With compression level 6, mem_level 6, strategy 0, zlib.compress gives 108182 bytes With compression level 7, mem_level 6, strategy 0, zlib.compress gives 107714 bytes With compression level 8, mem_level 6, strategy 0, zlib.compress gives 104922 bytes With compression level 9, mem_level 6, strategy 0, zlib.compress gives 103967 bytes With compression level 0, mem_level 7, strategy 0, zlib.compress gives 2403959 bytes With compression level 1, mem_level 7, strategy 0, zlib.compress gives 157836 bytes With compression level 2, mem_level 7, strategy 0, zlib.compress gives 145142 bytes With compression level 3, mem_level 7, strategy 0, zlib.compress gives 134822 bytes With compression level 4, mem_level 7, strategy 0, zlib.compress gives 119127 bytes With compression level 5, mem_level 7, strategy 0, zlib.compress gives 113359 bytes With compression level 6, mem_level 7, strategy 0, zlib.compress gives 107632 bytes With compression level 7, mem_level 7, strategy 0, zlib.compress gives 107275 bytes With compression level 8, mem_level 7, strategy 0, zlib.compress gives 104603 bytes With compression level 9, mem_level 7, strategy 0, zlib.compress gives 103742 bytes With compression level 0, mem_level 8, strategy 0, zlib.compress gives 2403954 bytes With compression level 1, mem_level 8, strategy 0, zlib.compress gives 157680 bytes With compression level 2, mem_level 8, strategy 0, zlib.compress gives 145059 bytes With compression level 3, mem_level 8, strategy 0, zlib.compress gives 134853 bytes With compression level 4, mem_level 8, strategy 0, zlib.compress gives 118942 bytes With compression level 5, mem_level 8, strategy 0, zlib.compress gives 113425 bytes With compression level 6, mem_level 8, strategy 0, zlib.compress gives 107872 bytes With compression level 7, mem_level 8, strategy 0, zlib.compress gives 107516 bytes With compression level 8, mem_level 8, strategy 0, zlib.compress gives 104837 bytes With compression level 9, mem_level 8, strategy 0, zlib.compress gives 103848 bytes With compression level 0, mem_level 9, strategy 0, zlib.compress gives 2403954 bytes With compression level 1, mem_level 9, strategy 0, zlib.compress gives 158120 bytes With compression level 2, mem_level 9, strategy 0, zlib.compress gives 145273 bytes With compression level 3, mem_level 9, strategy 0, zlib.compress gives 134947 bytes With compression level 4, mem_level 9, strategy 0, zlib.compress gives 119473 bytes With compression level 5, mem_level 9, strategy 0, zlib.compress gives 114064 bytes With compression level 6, mem_level 9, strategy 0, zlib.compress gives 108411 bytes With compression level 7, mem_level 9, strategy 0, zlib.compress gives 108041 bytes With compression level 8, mem_level 9, strategy 0, zlib.compress gives 105321 bytes With compression level 9, mem_level 9, strategy 0, zlib.compress gives 104264 bytes With compression level 0, mem_level 1, strategy 1, zlib.compress gives 2427294 bytes With compression level 1, mem_level 1, strategy 1, zlib.compress gives 176182 bytes With compression level 2, mem_level 1, strategy 1, zlib.compress gives 160285 bytes With compression level 3, mem_level 1, strategy 1, zlib.compress gives 146284 bytes With compression level 4, mem_level 1, strategy 1, zlib.compress gives 138646 bytes With compression level 5, mem_level 1, strategy 1, zlib.compress gives 129359 bytes With compression level 6, mem_level 1, strategy 1, zlib.compress gives 120436 bytes With compression level 7, mem_level 1, strategy 1, zlib.compress gives 119583 bytes With compression level 8, mem_level 1, strategy 1, zlib.compress gives 116264 bytes With compression level 9, mem_level 1, strategy 1, zlib.compress gives 115021 bytes With compression level 0, mem_level 2, strategy 1, zlib.compress gives 2415384 bytes With compression level 1, mem_level 2, strategy 1, zlib.compress gives 170222 bytes With compression level 2, mem_level 2, strategy 1, zlib.compress gives 155723 bytes With compression level 3, mem_level 2, strategy 1, zlib.compress gives 143172 bytes With compression level 4, mem_level 2, strategy 1, zlib.compress gives 134176 bytes With compression level 5, mem_level 2, strategy 1, zlib.compress gives 126207 bytes With compression level 6, mem_level 2, strategy 1, zlib.compress gives 118319 bytes With compression level 7, mem_level 2, strategy 1, zlib.compress gives 117738 bytes With compression level 8, mem_level 2, strategy 1, zlib.compress gives 114529 bytes With compression level 9, mem_level 2, strategy 1, zlib.compress gives 113488 bytes With compression level 0, mem_level 3, strategy 1, zlib.compress gives 2409474 bytes With compression level 1, mem_level 3, strategy 1, zlib.compress gives 164668 bytes With compression level 2, mem_level 3, strategy 1, zlib.compress gives 150928 bytes With compression level 3, mem_level 3, strategy 1, zlib.compress gives 139918 bytes With compression level 4, mem_level 3, strategy 1, zlib.compress gives 128996 bytes With compression level 5, mem_level 3, strategy 1, zlib.compress gives 121984 bytes With compression level 6, mem_level 3, strategy 1, zlib.compress gives 115209 bytes With compression level 7, mem_level 3, strategy 1, zlib.compress gives 114679 bytes With compression level 8, mem_level 3, strategy 1, zlib.compress gives 111747 bytes With compression level 9, mem_level 3, strategy 1, zlib.compress gives 110594 bytes With compression level 0, mem_level 4, strategy 1, zlib.compress gives 2406529 bytes With compression level 1, mem_level 4, strategy 1, zlib.compress gives 161203 bytes With compression level 2, mem_level 4, strategy 1, zlib.compress gives 148187 bytes With compression level 3, mem_level 4, strategy 1, zlib.compress gives 137649 bytes With compression level 4, mem_level 4, strategy 1, zlib.compress gives 125905 bytes With compression level 5, mem_level 4, strategy 1, zlib.compress gives 119155 bytes With compression level 6, mem_level 4, strategy 1, zlib.compress gives 113051 bytes With compression level 7, mem_level 4, strategy 1, zlib.compress gives 112575 bytes With compression level 8, mem_level 4, strategy 1, zlib.compress gives 109749 bytes With compression level 9, mem_level 4, strategy 1, zlib.compress gives 108727 bytes With compression level 0, mem_level 5, strategy 1, zlib.compress gives 2405059 bytes With compression level 1, mem_level 5, strategy 1, zlib.compress gives 159511 bytes With compression level 2, mem_level 5, strategy 1, zlib.compress gives 146528 bytes With compression level 3, mem_level 5, strategy 1, zlib.compress gives 136218 bytes With compression level 4, mem_level 5, strategy 1, zlib.compress gives 124186 bytes With compression level 5, mem_level 5, strategy 1, zlib.compress gives 117731 bytes With compression level 6, mem_level 5, strategy 1, zlib.compress gives 111589 bytes With compression level 7, mem_level 5, strategy 1, zlib.compress gives 111112 bytes With compression level 8, mem_level 5, strategy 1, zlib.compress gives 108285 bytes With compression level 9, mem_level 5, strategy 1, zlib.compress gives 107157 bytes With compression level 0, mem_level 6, strategy 1, zlib.compress gives 2404324 bytes With compression level 1, mem_level 6, strategy 1, zlib.compress gives 158833 bytes With compression level 2, mem_level 6, strategy 1, zlib.compress gives 146029 bytes With compression level 3, mem_level 6, strategy 1, zlib.compress gives 135299 bytes With compression level 4, mem_level 6, strategy 1, zlib.compress gives 123926 bytes With compression level 5, mem_level 6, strategy 1, zlib.compress gives 117330 bytes With compression level 6, mem_level 6, strategy 1, zlib.compress gives 111161 bytes With compression level 7, mem_level 6, strategy 1, zlib.compress gives 110609 bytes With compression level 8, mem_level 6, strategy 1, zlib.compress gives 107642 bytes With compression level 9, mem_level 6, strategy 1, zlib.compress gives 106434 bytes With compression level 0, mem_level 7, strategy 1, zlib.compress gives 2403959 bytes With compression level 1, mem_level 7, strategy 1, zlib.compress gives 157836 bytes With compression level 2, mem_level 7, strategy 1, zlib.compress gives 145142 bytes With compression level 3, mem_level 7, strategy 1, zlib.compress gives 134822 bytes With compression level 4, mem_level 7, strategy 1, zlib.compress gives 122917 bytes With compression level 5, mem_level 7, strategy 1, zlib.compress gives 116738 bytes With compression level 6, mem_level 7, strategy 1, zlib.compress gives 110681 bytes With compression level 7, mem_level 7, strategy 1, zlib.compress gives 110313 bytes With compression level 8, mem_level 7, strategy 1, zlib.compress gives 107484 bytes With compression level 9, mem_level 7, strategy 1, zlib.compress gives 106377 bytes With compression level 0, mem_level 8, strategy 1, zlib.compress gives 2403954 bytes With compression level 1, mem_level 8, strategy 1, zlib.compress gives 157680 bytes With compression level 2, mem_level 8, strategy 1, zlib.compress gives 145059 bytes With compression level 3, mem_level 8, strategy 1, zlib.compress gives 134853 bytes With compression level 4, mem_level 8, strategy 1, zlib.compress gives 123086 bytes With compression level 5, mem_level 8, strategy 1, zlib.compress gives 116643 bytes With compression level 6, mem_level 8, strategy 1, zlib.compress gives 110820 bytes With compression level 7, mem_level 8, strategy 1, zlib.compress gives 110508 bytes With compression level 8, mem_level 8, strategy 1, zlib.compress gives 107777 bytes With compression level 9, mem_level 8, strategy 1, zlib.compress gives 106770 bytes With compression level 0, mem_level 9, strategy 1, zlib.compress gives 2403954 bytes With compression level 1, mem_level 9, strategy 1, zlib.compress gives 158120 bytes With compression level 2, mem_level 9, strategy 1, zlib.compress gives 145273 bytes With compression level 3, mem_level 9, strategy 1, zlib.compress gives 134947 bytes With compression level 4, mem_level 9, strategy 1, zlib.compress gives 123774 bytes With compression level 5, mem_level 9, strategy 1, zlib.compress gives 117299 bytes With compression level 6, mem_level 9, strategy 1, zlib.compress gives 111406 bytes With compression level 7, mem_level 9, strategy 1, zlib.compress gives 111126 bytes With compression level 8, mem_level 9, strategy 1, zlib.compress gives 108399 bytes With compression level 9, mem_level 9, strategy 1, zlib.compress gives 107291 bytes |
This means that we can’t reproduce the same compressed data by using the standard implementation of DEFLATE algorithm using the zlib module in Python. Compare the above test results, we can see the following differences between PNG files created by Gimp and Windows Paint on Windows 10:
- IDAT chunks are in 8192-byte blocks in Gimp and 65445-byte blocks in Paint
- Windows Paint on Windows 10 must have applied a kind of pre-compression filtering to optimize the PNG file.
- Windows Paint on Windows 10 doesn’t use the optimal compression parameters.
Further experiments with Gimp 2.8 and Windows Paint on Windows 7 have shown that those applications use the standard DEFLATE algorithm to compress data in PNG files.
Optimize PNG files
Basically, there are three ways to optimize PNG files, namely,
- Use indexed colors instead of truecolors
- Filter image data before compression
- Use different implementations of DEFLATE algorithm which give better compression ratios, ie, 7-zip DEFLATE and Zopfli released by Google
Please refer to the following pages for more information about how to optimize PNG files: